How I Documented an Entire Product in 4 Days with an AI Agent
 Debbie O'Brien 20 min read
 I had 55 pages of documentation to write, 59 screenshots to capture, and a product that was still shipping features and being rebranded weeks before release. I did it in four days with Goose, an open-source AI agent by Block, part of the Linux Foundation, and I want to walk you through exactly how. Not the polished version. The real one: how I built it, how it works, everything that broke along the way, and what I learned from it.
The Problem
The AI Platform by Zephyr Cloud is a desktop app where teams collaborate with AI specialists in channels. Think Slack meets AI agents. The product had been moving fast for months. Features were shipping, the UI was evolving, and the documentation was… not keeping up. What existed was a handful of developer-focused reference pages. Markdown files describing CRDT schemas and workflow adapter formats. Useful if you were building the product. Useless if you were trying to use it.
We needed end-user documentation. The kind where someone installs the app, opens the docs, and understands how to create a channel, mention a specialist, and get work done. And we needed it before the official release, which was a few weeks away.
Why an AI Agent
I have written plenty of documentation by hand. It is one of the most time-consuming parts of shipping a product. Not because the writing itself is hard, but because of everything around it. You need to understand the feature by reading source code. You need to take screenshots. You need to crop and optimize them. You need to keep the screenshots updated when the UI changes. You need to maintain consistent voice and structure across dozens of pages. And you need to do all of this while the product is still changing underneath you.
I had been using the agent for other tasks in the codebase and thought: what if I could create a way to write all the documentation from source code, capture screenshots that could be recaptured any time the app changes, and also improve the documentation based on those screenshots.
For those unfamiliar, Goose is an open-source AI agent that runs on your machine. It can read and write files, run shell commands, interact with APIs, and use extensions and skills to specialize in different tasks. Skills are markdown files that encode instructions, conventions, and tooling for a specific task. When you load a skill, the agent follows those instructions. When you improve the skill, every future session benefits. It is the difference between telling an agent what to do every time and teaching it once.
The Plan
Before writing a single page, I sat down and created a phased plan. This turned out to be the most important decision of the whole project. You have an idea in your head but no real structure, and you need to think it through before throwing an agent at it. We created a tracer bullet format with sub-tasks so the agent could work phase by phase and tick off what it had done. One night I even went to bed and left it working on a task. The next morning I reviewed everything it had done and iterated over the parts that needed adjusting. I deliberately avoided using a loop where the agent just runs through everything unattended. I wanted to stay in charge and monitor how things were going, because I was also refining the skills as I went along.
- Phase 0: Restructure. Delete developer-focused content from the user guide. Move reference docs to a separate section. Set up the directory structure.
- Phase 1: Getting Started. Installation, account creation, platform tour, first channel. The first five minutes of the product.
- Phase 2: Daily Use. Chat, messaging, threads, specialists. The features people use every day.
- Phase 3: Power Features. Projects, tasks, workflows, knowledge garden. Features that experienced users reach for.
- Phase 4: Settings. Connections, sandbox, MCP servers, billing, permissions, browser extensions. Every settings page documented.
- Phase 5: Polish. Screenshots for all pages. Cross-linking. Consistent voice. Image optimization.
- Phase 6: Undocumented Features. Go through the app screen by screen and find anything I missed. This phase caught the embedded browser, the code editor panel, and several settings pages that had no documentation at all.
The phased approach mattered because it gave me clear stopping points. After each phase, I could commit, review, and course-correct.
The Three Skills I Built
Here is where it gets interesting. I did not just use the agent to write documentation. I built three skills that taught it how the documentation works, and those skills evolved throughout the project as I hit problems and found better approaches.
1. write-docs: The Style Guide in Code

This skill is 513 lines of instructions that define how every documentation page should be written. It covers:
Voice and tone. Casual and friendly. Direct. Confident. “Click Settings” not “You may want to consider clicking Settings.”
Formatting rules. Bold for UI elements the user needs to find. Italics for text the user will see but not interact with. Code backticks for anything the user types. No emojis. No em dashes.
Page structure. Start with what the user sees, not how it works internally. One idea per paragraph. Lead with the action. A full page template with frontmatter, headings, screenshots, callouts, and cross-links.
What not to document. Internal implementation details, developer workflows, API references, features behind feature flags. This is user documentation, not a code tour.
The skill also includes a verification checklist that the agent walks through before committing. Content checks (no emojis, no em dashes, UI elements bolded), screenshot checks (optimized, cropped, registered in the manifest), and a build check (pnpm build must pass with no dead links). It is not an automated gate. It is instructions baked into the skill that the agent follows every time.
Why does this matter? Because without it, every documentation session would start with me re-explaining the same conventions. With the skill loaded, the agent writes in the right voice from the first sentence. And when I noticed a pattern I did not like (too many callouts per page, screenshots that were too large), I updated the skill once and every future page followed the new rule.
2. doc-screenshots: Automated Screenshot Capture

This is the most technically interesting skill and the one that saved the most time. It is 478 lines of instructions backed by 1,722 lines of tooling code across four scripts: a bash CLI, a Python manifest runner, a Swift OCR text finder, and a Python highlight overlay renderer.
Why Not Playwright?
The first question people ask: why not use Playwright? I use Playwright every day. I love it. But it would not have worked here.
The AI Platform is a Tauri desktop app. The UI runs in a native webview, not a browser tab. Playwright automates browsers. It cannot connect to a Tauri webview. Even if you could somehow attach to the webview’s DevTools protocol, you would be fighting against the native window chrome, the system title bar, and the fact that the app’s routing and state management are wired through Tauri’s IPC bridge, not standard browser navigation.
I needed something that works at the OS level: find the window, click things on screen, capture what the user actually sees. That led me to Peekaboo, a macOS automation tool that interacts with apps through accessibility APIs and screen coordinates.
The Pipeline
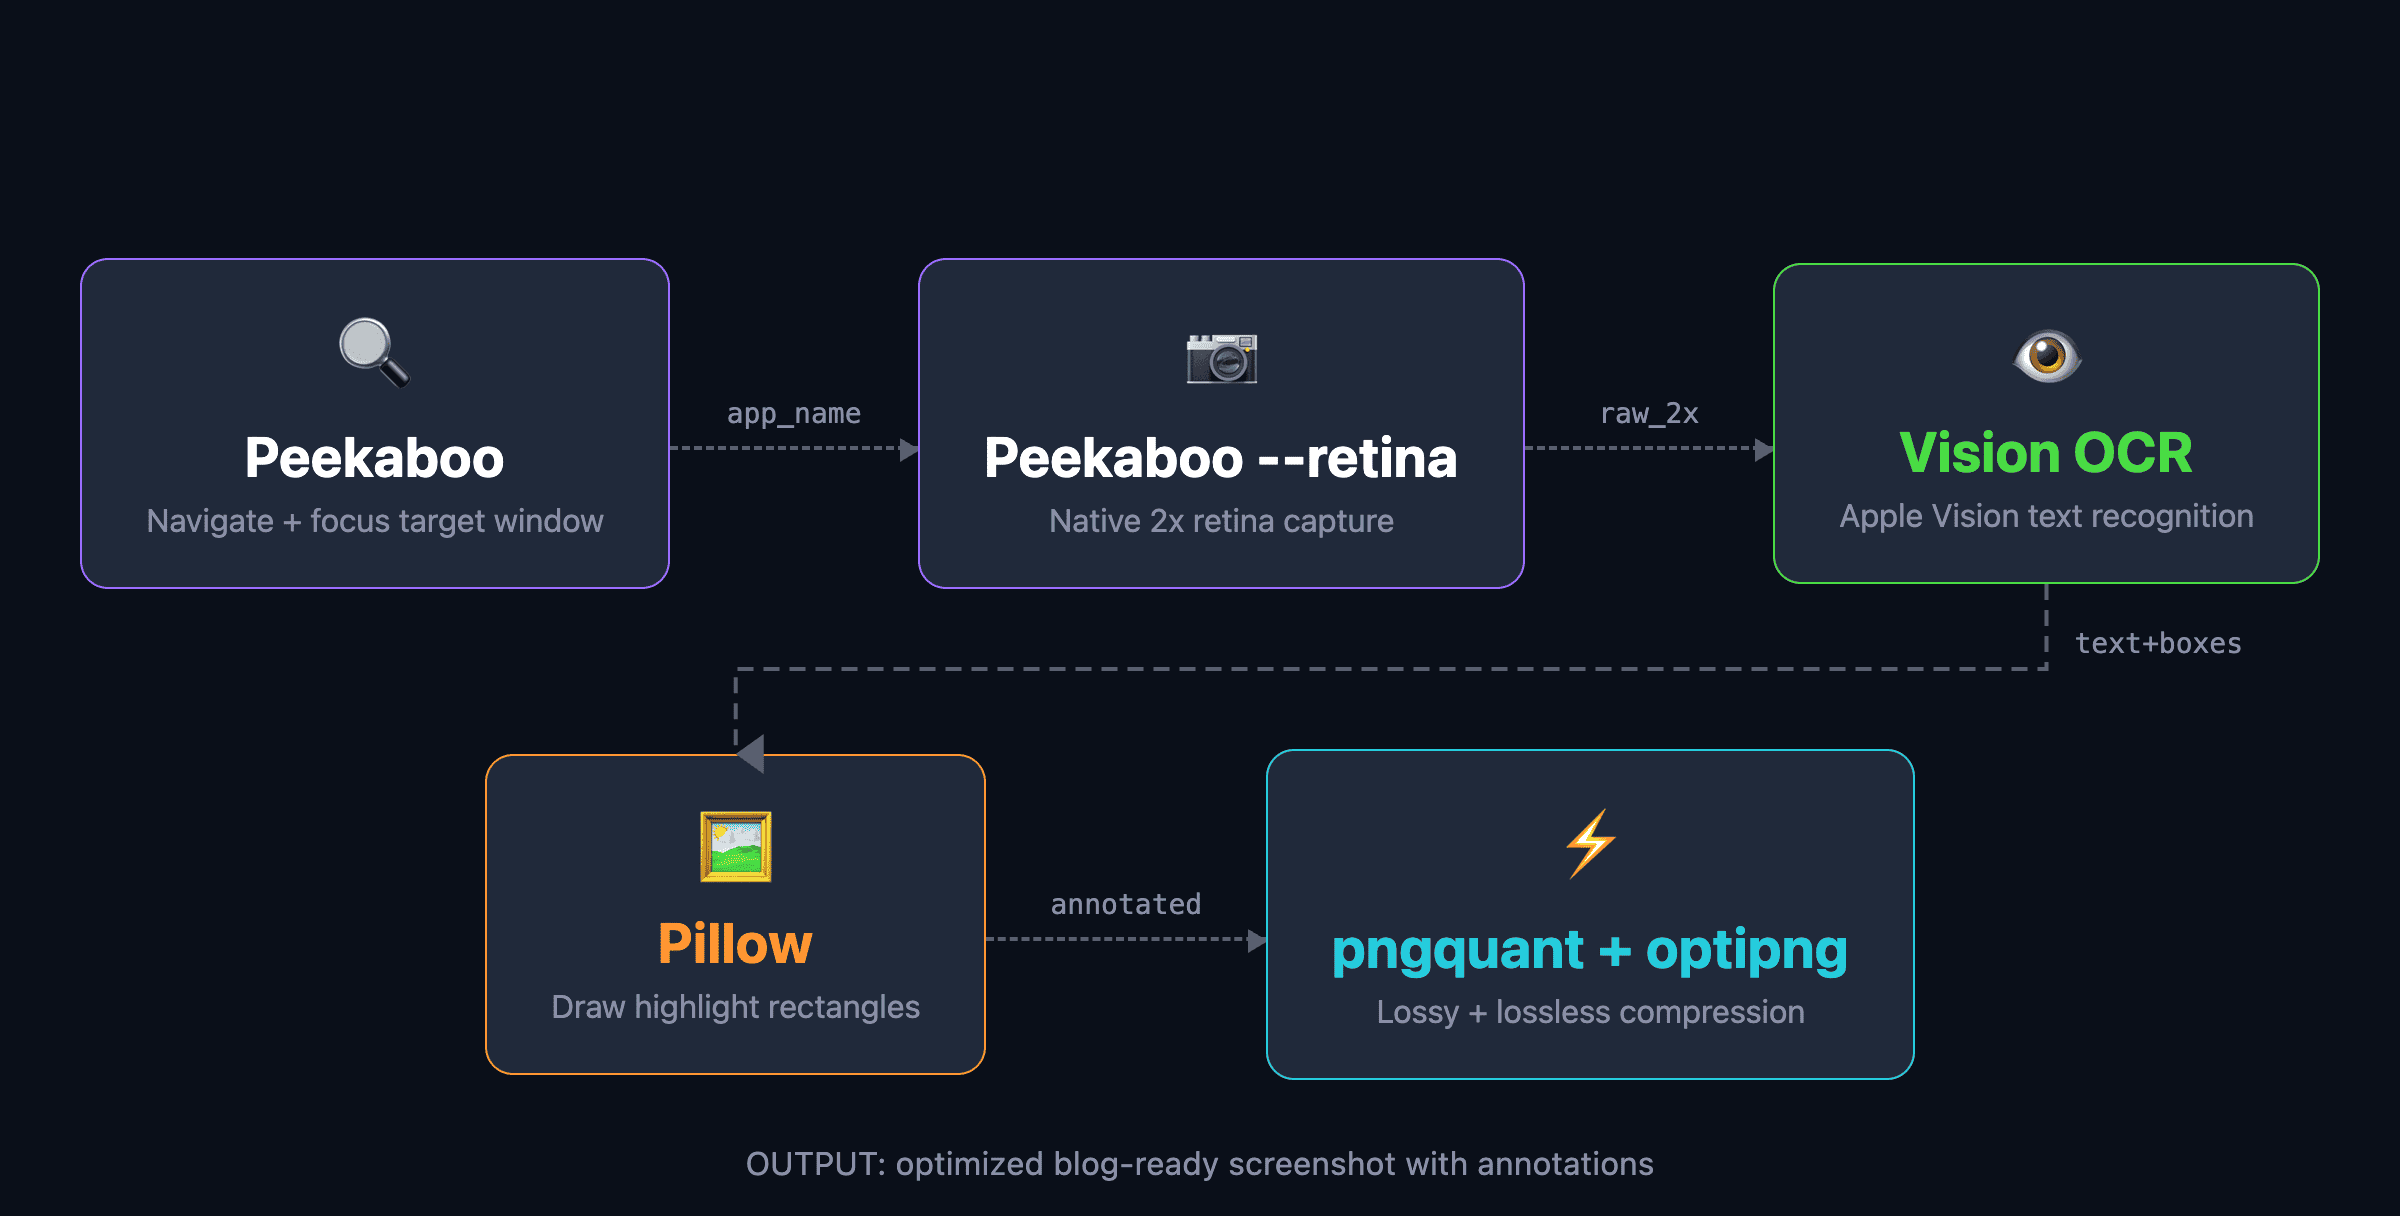
The pipeline works like this:
- Peekaboo finds the app window and focuses it. If you need to navigate somewhere first, it clicks UI elements by their visible text.
- Peekaboo
--retinacaptures the window at 2x retina resolution without the drop shadow. - A Swift script using the Vision framework runs OCR on the captured image. It finds every piece of text and returns pixel-accurate bounding boxes.
- A Python script using Pillow draws highlight overlays, borders, and spotlight effects on the image based on the OCR results.
- pngquant and optipng compress the final image. This typically reduces file size by 50 to 60 percent with no visible quality loss.
No hardcoded coordinates for content elements. No browser automation. No authentication tokens. The agent looks at the actual app window, reads the text on screen, and figures out where things are.
The pipeline originally used three separate native macOS tools stitched together. I filed an issue on the Peekaboo repo requesting retina capture support, and the maintainer shipped it within days. That simplified the pipeline to a single peekaboo image --retina call plus the Swift OCR script.
The Screen Takeover Problem
There is a real trade-off with this approach. Peekaboo needs the app window visible and in focus. While the audit or batch capture is running, it is clicking through your app, opening dialogs, navigating between pages, pressing Escape to close things. Your screen is not yours for the duration.
A full audit takes about 10 minutes. A full recapture takes 15 to 20. During that time, you cannot touch the mouse or keyboard without breaking the run. In practice, you kick off the batch, go make coffee, and come back to 59 freshly captured, cropped, and optimized screenshots. Captures can technically run in the background, but navigation clicks need the window in focus and control of the mouse. Even with a second monitor, if you move the mouse it interferes with the run. The agent needs your machine for the duration. Treat it as a coffee break. It is also not ready for CI yet since macOS CI runners do not have a logged-in GUI session with the Accessibility and Screen Recording permissions that Peekaboo needs.
The key insight was the screenshot manifest. Instead of capturing screenshots one at a time, I defined all 59 of them in a YAML file:
screenshots:
  - id: getting-started/app-overview
    output: docs/public/images/getting-started/app-overview.png
    crop: window
    description: >
      Full app window showing the icon rail, channel list,
      and a chat conversation.
    validate:
      - Channels

  - id: getting-started/create-channel-dialog
    output: docs/public/images/getting-started/create-channel-dialog.png
    crop: main
    steps:
      - click: '+'
        near: 'Channels'
      - wait: 1.5
    cleanup:
      - press: 'Escape'
Each entry declares what to capture, how to navigate there, what to crop, and what text should appear in the final image (the validate field). The manifest runner executes them in sequence, resetting the app state between each one.
The manifest means that when the UI changes, you do not retake screenshots by hand. You run the manifest and get all 59 back in one batch. An --audit mode walks every navigation step and reports which targets are broken. A --compare mode recaptures everything and saves new versions alongside the originals for side-by-side review.
I ran the audit while writing this blog post. 50 of 59 passed. Every failure was about test data that had changed (renamed channels, deleted workflows), not broken navigation. The core paths all still worked. The lesson: treat screenshot test data like E2E fixtures. Navigation screenshots are stable. Content-dependent ones need a dedicated docs workspace with controlled data.
3. docs-preview: Deploy and Verify

The simplest skill, at 155 lines, but it solved two problems at once.
Why not localhost? The documentation site builds with Rspress. You can run pnpm dev and preview on localhost:3000, but that only works for you. You cannot share a localhost URL in a PR review, paste it into a Slack thread, or hand it to a teammate to check your work. I needed shareable URLs.
The docs build uses the withZephyr() Rspress plugin, which uploads the built site to Zephyr Cloud’s edge network on every pnpm build. The whole cycle takes under 2 seconds. Build, upload, deploy, live URL. I timed it while writing this post: 1.8 seconds for 55 pages and 59 images to go from source files to a production-ready URL on a global CDN.
That means every time the agent finishes writing or updating a page, it can build and hand me a live URL to check in the browser. No local server to start, no port conflicts, no “works on my machine.” Just a URL that anyone on the team can open.
The URL problem. Every build produces a unique URL with a hash suffix that changes each time. AI agents are bad at this. The URL has a fixed project number (like 213) and a per-build hash (like 4a62f09db). Before the skill existed, the agent would sometimes “increment” the project number thinking it was a build counter, or type a URL from memory with a fabricated hash. Both produce links that have never existed and always 404.
The skill stamps that out. It pipes the build output to a log file and re-greps the log whenever the URL is needed. It includes explicit warnings about not reusing stale URLs and not typing URLs from memory. Simple, but it eliminated a genuinely annoying class of failures.
Verifying the Docs With Playwright CLI
There is an important distinction in this workflow. Peekaboo automates the desktop app to capture screenshots. But who verifies that the documentation pages themselves render correctly?
That is where Playwright CLI comes in. It is a command-line tool that wraps Playwright’s browser automation into simple terminal commands. The agent uses it to open the built documentation site in a real browser, take a DOM snapshot, and verify that headings and images rendered correctly.
The verification flow looks like this. After the agent writes a page, it runs playwright-cli snapshot to get the full DOM tree and checks that the H1 matches, all images loaded, the sidebar navigation includes the new page, and the table of contents lists the right H2 headings. If something is missing or broken, it fixes the page and rebuilds.
This matters because a build passing does not mean the page looks right. Rspress generates static HTML that hydrates with React, so a page can exist but render incorrectly if something is off in the markdown or frontmatter. Playwright actually loads the page in a browser engine and lets the agent inspect what a user would see. It catches dead images, broken navigation links, callouts that rendered as raw markdown instead of styled containers, and layout issues that only show up in the browser.
Two tools, two targets. Peekaboo verifies the app. Playwright CLI verifies the docs about the app.
Working With the Agent, Not Watching It
I want to be clear about something: this was not me kicking off an agent and walking away. It was a constant back-and-forth, like working with a colleague sitting right next to you.
Every page went through iteration. I would review what the agent wrote, point out what was wrong, ask for restructuring, and push back on phrasing. The getting started guide in particular went through several rounds of reworking. What is the right order to introduce features? Should installation come before the platform tour or after? How do you title a page so someone scanning the sidebar instantly knows what it covers? These are editorial decisions that an agent cannot make alone.
One technique that worked well was passing screenshots directly to the agent and saying “check all the clickable items on this and document anything I missed.” This shifted the process from documenting based on source code to documenting based on what a user actually sees. The agent could look at a screenshot, identify buttons, tabs, and menu items through OCR, cross-reference them with the existing docs, and flag the gaps. That is how I caught undocumented features like the embedded browser and the code editor panel in Phase 6.
The quality of what the agent produced was good first-draft material that needed editorial direction, not a rewrite. The voice was right because the skill defined it. The structure was right because the template enforced it. What I spent my time on was the higher-level decisions: how to organize the getting started flow, what to emphasize, what to cut, and making sure the documentation told a coherent story rather than just listing features.
You can see the output at docs.theaiplatform.app. The Platform Tour shows the structure I landed on for the getting started flow. The Chat section shows how a feature area breaks down into overview, channels, and messaging pages. The Settings section shows the most straightforward pages where the structure was consistent enough that the agent could produce near-final drafts with minimal editing.
A Day-by-Day Walkthrough
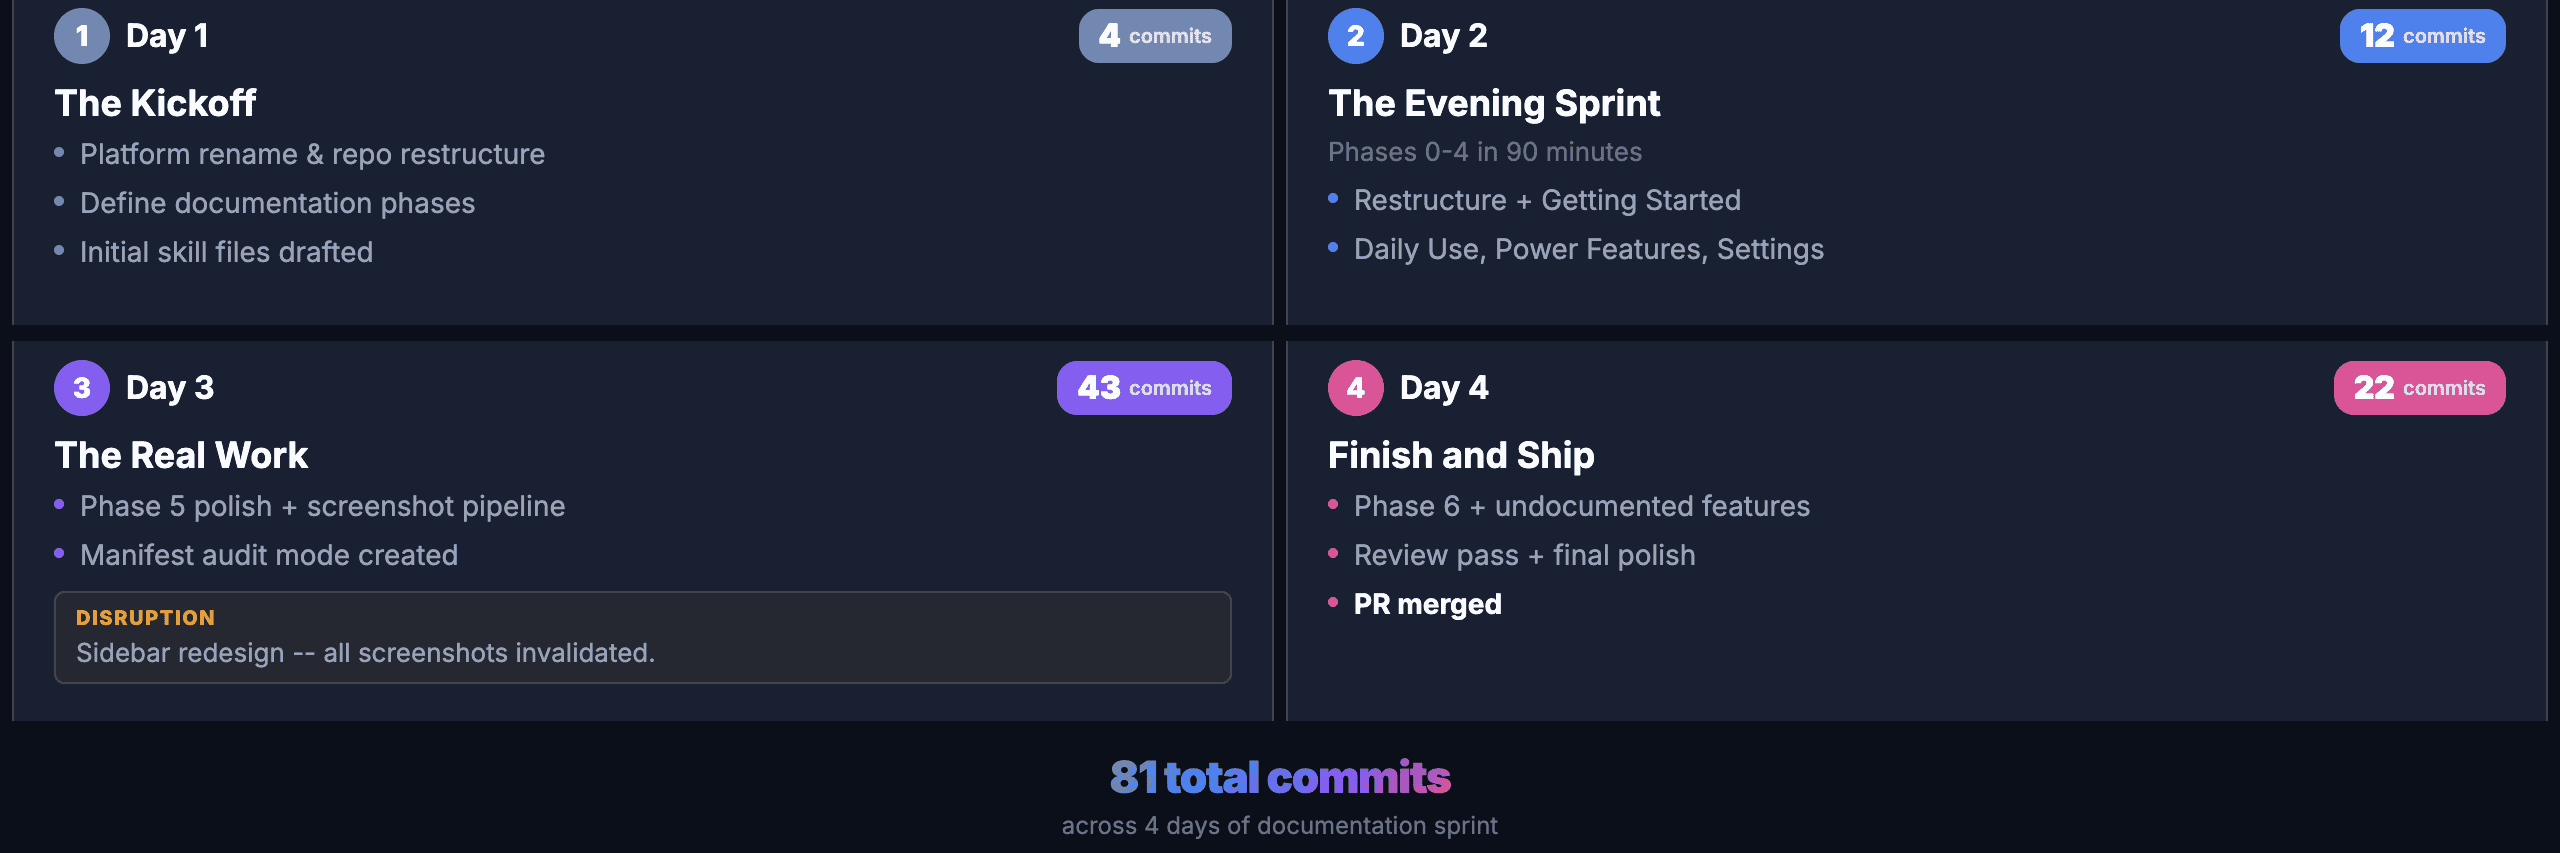
Day 1: The Kickoff
Day 1 was about the plan. I sat down and mapped out the phased approach: what to tackle in what order, how to break 55 pages into manageable batches, and what the agent would need to know before writing the first page. This was the most important work of the entire sprint. The product was also being rebranded, so I ran a rename pass across the existing documentation. Four commits. No new content yet, but the groundwork was laid.
Day 2: The Evening Sprint
Phases 0 through 4 in a single evening. This sounds aggressive, and it was. But the phased plan made it possible. Each phase had a clear scope, and the agent could read the source code to understand each feature before writing about it.
The first commit kicked off Phase 0, which restructured everything, moving 6,769 lines of developer-focused content out of the user-facing docs. Then Phases 1 through 4 each produced a batch of pages with screenshots.
Twelve commits in about ninety minutes. All the scaffolding, all the content, all the initial screenshots. The quality was rough in places (I would fix that in later phases), but the coverage was there. Every major section of the product had at least a first-draft page.
Day 3: The Real Work
Day 3 had 43 commits. This is where the polish happened and where most of the problems surfaced.
Phase 5 started with adding missing screenshots and cross-links. Then the big disruption: the app’s sidebar got redesigned mid-sprint. Text labels were replaced with an icon rail. Every screenshot showing the sidebar was wrong. Every navigation step clicking a text label was broken. The manifest paid for itself here. I updated the navigation steps, re-ran the batch, and had all 59 screenshots regenerated in minutes instead of retaking them by hand.
I also added reset steps to the manifest on day 3. Before each screenshot, the runner presses Escape twice and clicks the Chat icon to return to a known state. Without this, a failed screenshot left the app in a broken state that cascaded into every subsequent capture.
Day 4: Finish and Ship
Day 4 was Phase 6 (undocumented features) plus a thorough review pass. The embedded browser and code editor panels had no documentation at all. The agent read the source components, I opened the app to verify what the UI actually looked like, and wrote the pages together.
The review pass caught real issues: contradictory text on the account creation page, screenshots that were cropped too loosely, duplicate content between the workflows overview and the build-and-run page.
The final commit merged the PR: 55 documentation pages, 59 screenshots, and the three skills.
What Broke Along the Way
The Rebrand
The product was rebranded from Zephyr Agency to The AI Platform during the documentation sprint. The rename itself is mechanically simple (find and replace), but the follow-on work is not. Alt text on 59 screenshots. Config files. Every page referencing the product name. Sentences that started with the product name suddenly reading awkwardly with the article “The” prepended. This is not an agent problem. It is just the reality of documenting a product that is still evolving. But it added real friction to a sprint that was already moving fast.
OCR Is Not Perfect
The Vision framework’s OCR is very good, but not flawless. It occasionally misreads text. “Get update” becomes “Get undate.” The letter “I” gets confused with “l” in certain fonts. When the agent tries to click “Get update” and OCR returns “Get undate,” the navigation step fails.
The workaround I built into the skill: search for a substring instead of the full text, use nearby anchor text to disambiguate, or fall back to coordinate-based clicking. The continue_on_failure flag on manifest steps lets non-critical navigation steps fail without aborting the entire screenshot.
Tooltips and Hover States
Moving the mouse to click an element sometimes triggers a tooltip that appears in the screenshot. The fix was straightforward once I understood it: move the cursor away from interactive elements before capturing. The script now does this automatically, but it cost me a round of retakes before I figured out what was happening.
What Worked Surprisingly Well
Skills as Accumulated Knowledge
The three skills started small and grew with every problem I hit. The doc-screenshots skill started as a wrapper around screencapture and Pillow. By the end, it had manifest batch processing, audit mode, validation, reset steps, coordinate-based fallbacks, card-level pixel scanning, and anti-tooltip cursor management.
Each improvement was triggered by a real problem. And because skills persist across sessions, the fix was permanent. The next time anyone on the team works on documentation, all of those fixes are already loaded.
The Manifest as a Screenshot Database
Defining all 59 screenshots declaratively in YAML turned out to be the single most valuable technical decision. Not because batch capture is faster than individual capture (it is), but because it made screenshots a reproducible artifact. The sidebar redesign on day 3 proved it: update a width constant and a few navigation steps, run one command, and all 59 screenshots are regenerated. No manual retakes.
Reading Source Code for Accuracy
The agent reads the actual source code before writing documentation. When the docs said “click the + button next to Channels,” it was because the agent had found that button in the component tree, not because it was guessing. That said, source code is not always the final truth. The running app sometimes differs from what the code suggests. The skill instructs the agent to verify text against screenshots using OCR and update the docs when they do not match.
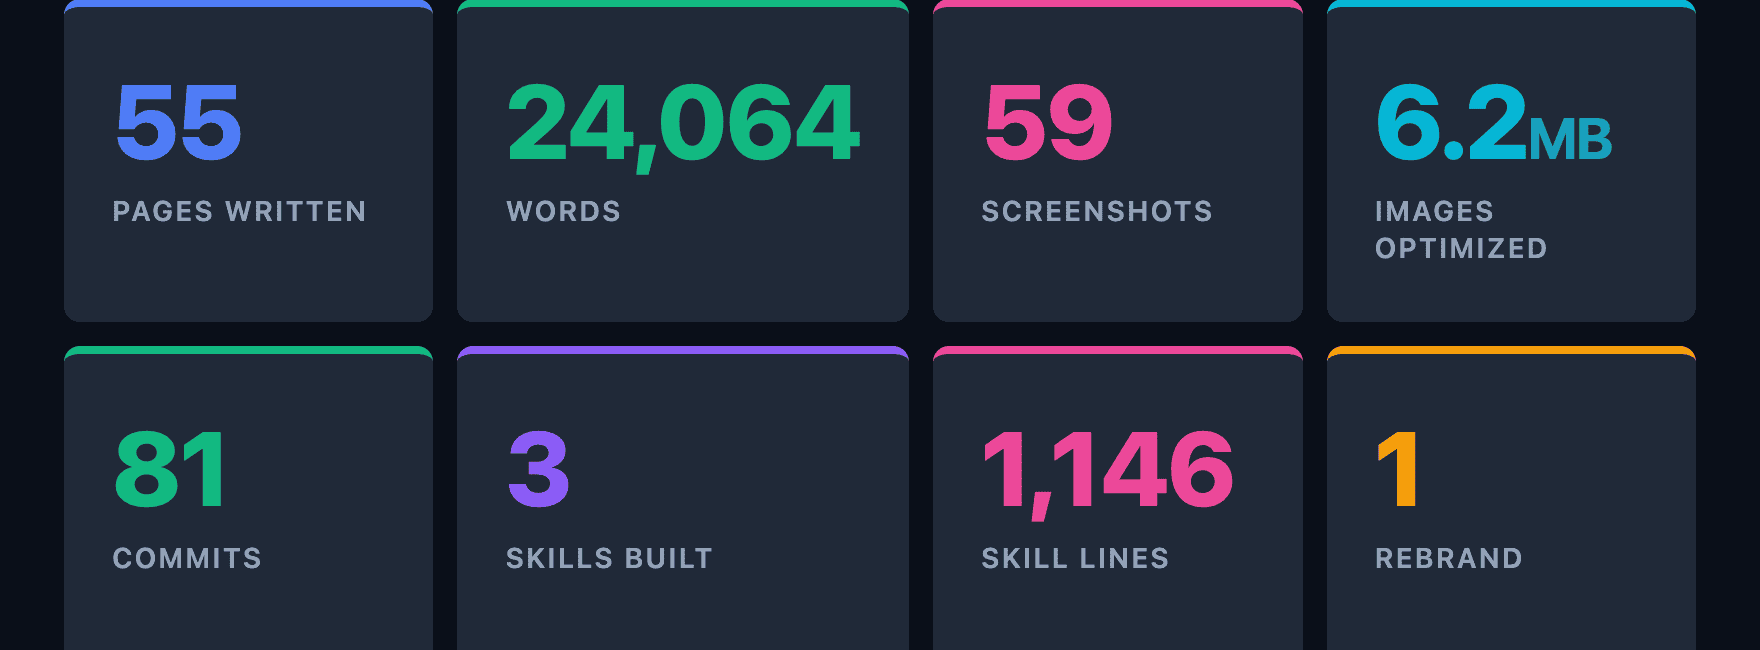
By the Numbers
What I Would Do Differently
Start the skills earlier. The skills were created during the documentation sprint itself. If I had written even a rough version of the write-docs and doc-screenshots skills before starting, the first day would have gone smoother. The early pages needed more revision because the conventions were not yet codified.
Find a way to run screenshot audits in CI. As mentioned above, the navigation clicks need a real display, so CI is not an option yet. But even running --audit locally before merging a PR that touches the UI would catch most stale screenshots early.
Write the manifest first, content second. I wrote pages and captured screenshots as I went. It would have been faster to define the full manifest up front (just the navigation steps, no content), run it once to see what the app actually looks like everywhere, and then write the pages based on real screenshots instead of source code alone.
What You Can Take Away
If you are thinking about using an AI agent for documentation, here is what I think matters most.
Teach the agent, do not just instruct it. A prompt that says “write documentation for this feature” produces generic content. A skill that defines your voice, your formatting rules, your page structure, and your verification checklist produces documentation that sounds like your team wrote it. The upfront investment in the skill pays off on every subsequent page.
Make screenshots reproducible. Manual screenshots are the first thing that goes stale. A declarative manifest that can regenerate every screenshot in one command is worth the engineering effort. It changes screenshots from a one-time cost to a maintained artifact.
Phase your work. Even if you are using an agent, “write all the docs” is not a plan. Break it into phases with clear scope and clear deliverables. This gives you stopping points, review points, and the ability to course-correct.
Expect things to break. OCR will misread text. The UI will change mid-sprint. Preview URLs will go stale. The difference between a frustrating experience and a productive one is whether you encode the fix into a skill so it never happens again.
Review everything. The agent does not replace your judgment. It replaces the mechanical work. You still need to read every page, check every screenshot, and verify that the documentation matches what the user actually sees. The agent writes the first draft. You make it right.
Making Docs Agent-Ready
Writing 55 pages for humans was only half the problem. Agents need to read documentation too.
I added llms.txt and llms-full.txt to the documentation site using the Rspress @rspress/plugin-llms plugin. The llms.txt file is a structured index of every page with one-line descriptions. The llms-full.txt file is the entire documentation site as a single 3,000-line markdown file that an agent can ingest in one request. Every page also has “Copy as Markdown” and “Open in Claude” buttons so users can feed specific pages to an LLM directly.
This is live now. Any agent that can fetch a URL can read the entire documentation in seconds.
Automated Video Walkthroughs (Work in Progress)
Screenshots document a single state. But some features are easier to understand when you see them in motion. Creating a channel, mentioning a specialist, watching the response stream in. These are flows, not static screens.
I have a proof of concept for automated video walkthroughs using Peekaboo. The same manifest that defines screenshot navigation steps can drive a screen recording session: navigate to the starting point, start recording, walk through the steps, stop recording. The tooling exists in early form and produces usable results, but it is not production-ready yet. I am still working on consistent timing, smooth scrolling, and keeping the recordings tight enough to be useful without being rushed.
The goal is to embed these videos directly in the documentation pages so that when the UI changes, both screenshots and videos can be regenerated from the same manifest. That is not done yet, but the foundation is there.
The Future: Documentation in an Agent-First World
Here is what I keep thinking about. I just spent four days writing 55 pages of documentation. It is good documentation. People will use it. But the way people use software is changing.
If you have a product with AI specialists built in, the product itself can guide you. Instead of leaving the app to read a documentation page about how to create a workflow, you ask the specialist in the app and it walks you through it. Instead of searching the docs for how to configure a setting, you describe what you want and the agent does it for you.
That does not mean documentation is dead. It means its role is shifting. Documentation becomes the knowledge layer that agents draw from. The llms.txt work is a step in that direction. But the bigger shift is making the product itself so intuitive, with specialists that genuinely help, that fewer people need to leave the app to figure things out.
We are not there yet. Right now, the documentation is essential. But the future we are building toward is one where the product teaches you how to use it, and documentation exists as a reference layer for agents and for the edge cases that in-app guidance does not cover.
The documentation is live at docs.theaiplatform.app. If you want to try The AI Platform, it is available for macOS, Windows, and Linux.
And yes, this blog post was also created using Goose. It took about five hours of back-and-forth: pulling git history, running the audit and compare, timing preview builds, drafting sections, and then iterating step by step, redrafting, re-checking, and fixing everything until it was right. Agent-driven, not agent-written. Same process as the docs.